You've sent an urgent email. Hours pass, and no response. Do you keep your cool, or fly off the handle?

Latest features and tips from JangoSMTP, a cutting-edge transactional email service with tracking.
Thursday, December 2, 2010
Tuesday, November 23, 2010
Why the SMTP service requires a list of From Addresses when using SMTP Authentication
12/6/10 - IMPORTANT UPDATE - As of December 6, 2010, the SMTP service NO LONGER requires a list of From Addresses when using SMTP Authentication. You can disregard this blog post, which was originally written on November 23, 2010. If you're interested in a bit of JangoSMTP history though, then feel free to read on!
-------------------------------------------------------
There are two ways to authenticate into to the JangoSMTP service:
Some might guess that it's a security issue, to prevent a flood of unauthorized emails being relayed through a user account should the username and password become compromised or end up in the wrong hands.
It's actually not a security issue, but an architectural limitation of the SMTP service that we will soon be fixing. An explanation of this architectural limitation, for interested readers, is below.
The basic limitation is that SMTP username/password authorization is done at the SMTP-transmission level, and once the email arrives, there is nothing inside the email message to indicate what SMTP username was used to allow the email to arrive in the first place. Hence, the system has to key off the From Email Address.
The steps JangoSMTP takes when an email is relayed to the SMTP server are:
-------------------------------------------------------
There are two ways to authenticate into to the JangoSMTP service:
- By IP Address of the connecting application
- By SMTP authentication with username and password, also known as SMTP-AUTH. This, coupled with a specified From Address allows you to send an email through the SMTP server.
Some might guess that it's a security issue, to prevent a flood of unauthorized emails being relayed through a user account should the username and password become compromised or end up in the wrong hands.
It's actually not a security issue, but an architectural limitation of the SMTP service that we will soon be fixing. An explanation of this architectural limitation, for interested readers, is below.
The basic limitation is that SMTP username/password authorization is done at the SMTP-transmission level, and once the email arrives, there is nothing inside the email message to indicate what SMTP username was used to allow the email to arrive in the first place. Hence, the system has to key off the From Email Address.
The steps JangoSMTP takes when an email is relayed to the SMTP server are:
- At the SMTP level, the email is authenticated by connecting IP address or by SMTP-AUTH. The email must conform one of those two checks in order to arrive. Otherwise, the email will be rejected at the SMTP level with a "we do not relay" error after the RCPT-TO command during the SMTP transaction.
- Once the email has arrived, a secondary process analyzes the email file in order to determine to what user account it belongs. First, the connecting IP address, which is present at the top of the file in the "Received" line is matched against IP addresses specified in user accounts, and if a match is found, the email is determined to be of that user account. If there's no match, then the assumption is made that the email arrived via SMTP-AUTH and not by IP Address Authentication. In this case, however, there is nothing in the email file that indicates what SMTP username/password were used to transmit the email message, since the SMTP username/password authentication is done during the SMTP level message transmission. No header within the email file contains the SMTP-AUTH information. It is for this reason that the process must rely on the From Address to determine to what user account the email belongs.

- If it cannot be determined to what user account an email message belongs, it is discarded. If it can be determined, then the process continues with the next step.
- Next the email message is passed to a web service, where it is disassembled and reassembled order to add open tracking, click tracking, DKIM signing, and other mechanics that JangoSMTP supports.
- Lastly the web service passes the email message to an email sending server in order for final transmission to the email recipient.


Thursday, November 18, 2010
JangoSMTP Ports
We've recently had some users ask us on what ports they can connect to the SMTP server at relay.jangosmtp.net. While it's documented on our website on the How it Works page, we thought a separate blog post would make it clearer. You can connect to relay.jangosmtp.net on ports:
- 25
- 2525
- 587
- 465 for SSL/TLS connections
Sunday, November 14, 2010
Transactional Email integration with Google Analytics
Google Analytics integration is now available with transactional email sent through the SMTP relay or through the API.
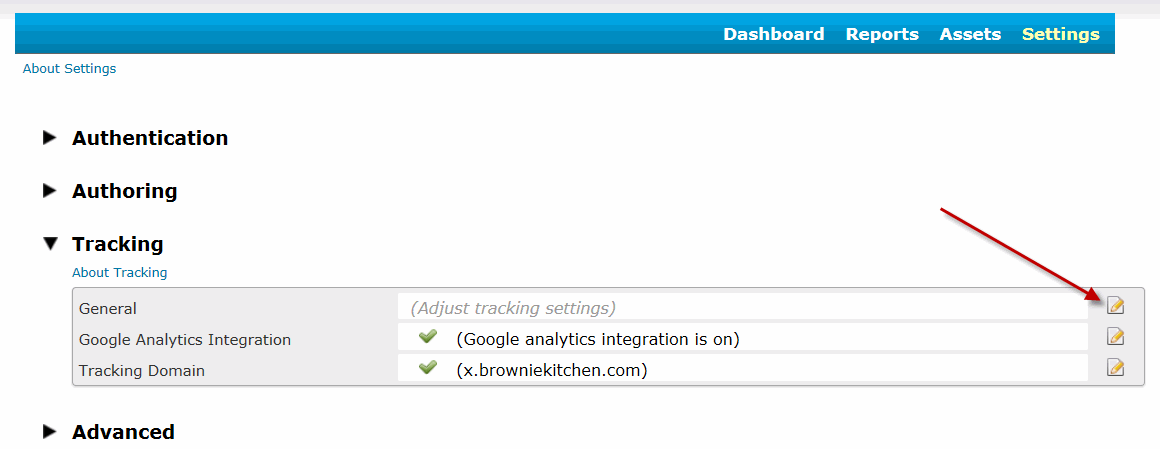
To start tracking your transactional email with Google Analytics, first turn on Google Analytics in your JangoSMTP account. Click the Edit Icon next to Google Analytics Integration under Settings --> Tracking and follow the steps outlined in the Procedure section.


Transactional email with click-tracked links will take the recipient to a URL that looks like this:
http://www.browniekitchen.com/?utm_source=JangoMail&utm_medium=Email&utm_campaign=Welcome+Group+(22514)&utm_content=ajay.goel%gmail.com
For transactional email, the Campaign Name inside your Google Analytics account will be the Transactional Group Name inside your JangoSMTP account. And the Content inside your Google Analytics account will be the email address of the recipient.
For transactional email, it wouldn't make sense to use each individual email's Subject line, because if you send 1,000 transactional emails, all with different Subject lines, you'll end up with 1,000 different campaigns in your Google Analytics account, and making sense of the data would be impossible. That's why transactional emails will be categorized by their Transactional Group Name and not their Subject.
You may use any combination of these values in the four Google Analytics variable fields:
%%EmailAddress%% = the email address of recipient
%%TransactionalGroupName%% = the Transactional Group Name of a transactional email
%%TransactionalGroupID%% = the Transactional Group ID of a transactional email

To set this up...
1. You must have click-tracking enabled on your transactional email. If using the SMTP Relay, check the Activate Click Tracking checkbox under Settings --> Tracking --> General. If using the transactional email API, set "ClickTracking=True" in the Options input parameter of one of the following methods:
SendTransactionalEmail
SendTransactionalEmailFromTemplate
2. Turn on Google Analytics by checking the box under Settings --> Tracking --> Google Analytics Integration, as shown in the second screenshot.
Wednesday, October 27, 2010
New Feature: Our platform, your servers
Going Freemium: Our platform, your servers
How can this possibly work?
By setting your account to use a Smart Host, you are telling JangoSMTP to route email messages through the Smart Host rather than directly to the recipients. The Smart Host will actually deliver each email message to the recipient.
For example, let's say you manage www.browniekitchen.com. Your corporate email servers are smtp.browniekitchen.com and smtp2.browniekitchen.com, and you want your transactional email sent from your servers instead of ours. You would designate these to be the Smart Hosts for your JangoSMTP account. You then use your JangoSMTP account to send 100 email messages, to varying domains, like yahoo.com, gmail.com, and aol.com. JangoSMTP will send all 100 emails to smtp.browniekitchen.com and smtp2.browniekitchen.com, and these servers will then deliver the email messages to Yahoo's, GMail's and AOL's servers.
In essence, when using Smart Hosts with the SMTP relay, your application would relay the emails to relay.jangosmtp.net, which would then process the email, add open tracking, click tracking, and a DomainKeys signature, and then relay the email back to your own server for delivery to the recipient.
So the Smart Host is just a middleman server between JangoSMTP and the final recipient?
Yes. It allows the emails to originate from your IP and your domain name and your organization rather than ours. It allows you complete control over your own email deliverability, and allows you to monitor SMTP logs, traffic, blocks, and throttling on your email server. Learn more about Smart Hosts with the Wikipedia article on Smart Hosts.
 What's the point of this feature?
This feature is meant for those customers that want to use us for everything, except email deliverability, and enjoy a significant cost savings for doing so. It's for those that like our feature set, our interface, our API, and everything else about JangoSMTP, but don't need us for actual email delivery, because their own email servers can handle that.
We spend a lot of time ensuring that our own email servers are clean, fast, of high reputation, and secure. Deliverability issues can also be difficult to research. By allowing you to have the emails sent from your own email servers, it gives you the full power to research such issues because you now have the information necessary to do so.
Setting up this feature is not for the average JangoSMTP user. It's meant for network administrators, sysadmins, and developers who want to take advantage of a significant cost savings by offloading email delivery onto their own network. When using a Smart Host, you must ensure that the Smart Host is configured properly to deliver high volume email. Most corporate email servers are not able to deliver high volume email because a.) Their upstream ISP does not allow the network to be used for mass email delivery and b.) The IP address of the organization's email server does not have the deliverability reputation necessary to deliver large amounts of emails to consumer email domains, like gmail.com, yahoo.com, aol.com, and live.com. This reputation can be developed over time, however, using a process called IP Warmup.
How do I configure my Smart Host to send emails from JangoSMTP?

Click the Edit Icon next to Settings --> Advanced --> Smart Hosts. You must ensure that your Smart Host server is able to relay emails that originate from our IP addresses. By default, all emails being routed to Smart Hosts will be sent from one of three IP addresses:
sh1.jsmtp.net - 216.75.6.141
sh2.jsmtp.net - 209.190.39.50
sh3.jsmtp.net - 66.40.10.14
This list of servers is also shown in this section. You should enter all of the IP addresses into the "Authenticated IPs" or "Allow Relays From these IPs" settings in your smart host's SMTP settings.
Optionally, if your Smart Host server is able to authenticate by domain name, you can allow any servers that are named *.jsmtp.net to relay through your server. That way, should the JangoSMTP IP addresses change, you won't need to change your smart host configuration.
If you don't do this, when JangoSMTP attempts to send emails to your smart host, JangoSMTP will get a "Relay access denied" or "Unable to relay email" type SMTP error, and the email will not deliver.
You can test your email server's configuration with the Test Icon under Settings --> Advanced --> Smart Hosts. The test feature will attempt to relay an email message through your email server from all three JangoSMTP servers. If the test passes, you're ready to send through your Smart Hosts. If the test fails, that means you haven't configured your Smart Host properly to allow SMTP relays from the three JangoSMTP IP addresses.

In the above example for the Brownie Kitchen account, emails sent to yahoo.com will be sent by smtp2.brownikitchen.com and all other emails will be sent by smtp.browniekitchen.com. Domain-specific rules take precedence over an ALL DOMAINS rule.
Can I use a third party server as my JangoSMTP Smart Host?
Yes, you can! There are many third-party SMTP services, any of which you can use as a smart host with JangoSMTP, provided that third-party SMTP service allows relay authentication by IP address. Remember that wherever your smart host is located, it must allow relays from our three IP addresses:
sh1.jsmtp.net - 216.75.6.141
sh2.jsmtp.net - 209.190.39.50
sh3.jsmtp.net - 66.40.10.14
Unfortunately we do not support SMTP-AUTH authentication.
This may lead to the question: Can a JangoSMTP user use JangoSMTP as the Smart Host? Your account is prevented from doing this, as this would create an infinite email loop.
Won't SPF/SenderID fail if I set a smart host?
Not if you set up properly. You must carefully take into account SPF/SenderID settings when using a smart host. You need to ensure the following:
- Ensure that the MAIL-FROM setting is correct.
a. Transactional email via API: Set UseSystemMailFrom in the Options parameter to False.
b. Transactional email via SMTP Relay: Uncheck the Use system MAIL-FROM address box under Settings --> Tracking --> General.


- Ensure that the SPF record for the domain in your From Address, which is a DNS TXT record, includes the IP address of your Smart Host.
For example, if you're sending emails from orders@browniekitchen.com, and your Smart Host is smtp.browniekitchen.com, and the IP address for smtp.browniekitchen.com is 10.10.10.5, then the SPF record for browniekitchen.com might look like this:
"v=spf1 include:jangomail.com ip4:10.10.10.5 a mx -all"
While the include:jangomail.com directive is not necessary, it can be left in place in case Smart Hosts are ever removed from your account in the future.

Most feedback loops (FBLs) work based on the sending IP address. Yahoo! is the exception, as it's based on the DomainKeys signature. Since by using Smart Hosts, the sending IP address will be that of your own email server, you must set up FBLs for your own IP. For ease of management, you may have the abuse reports sent to fbl_sh@us.jangomail.com, a special email address we've set up to process Abuse Reports for customers using Smart Hosts.
How do I my ensure DomainKeys/DKIM settings work?
DomainKeys/DKIM headers are preserved in transit, so regardless of how many email servers your messages bounce between before arriving to their final recipient, your DomainKeys/DKIM headers will remain intact.
What are the disadvantages of using Smart Hosts?
When you have your emails sent through your own smart hosts, you are in charge of all email delivery issues. Our support staff will only be able to provide very limited help for email delivery issues since the email is being sent from your server, not ours. Therefore, it's only recommended you use this feature if you're able to monitor your delivery as well. All tracking functionality, like open tracking, and click tracking, and web site activity tracking, will still work, and you'll still see all of that data in Reporting.
Will I lose any functionality if I send through a Smart Host?
No. Every single JangoSMTP feature will still work. The only difference when you setup Smart Hosts is that the emails are sent from your servers, not ours.
What if I try sending through my own servers, but I find the email deliverability too difficult to manage?
No problem, you're welcome to come back to the "regular" JangoSMTP service and have the emails sent through our high deliverability servers. All you have to do is delete the Smart Hosts entries from your Settings --> Advanced --> Smart Hosts page.
What are the cost savings for sending through my own servers?
You may send up to 100,000 emails/month for free through JangoSMTP if using Smart Hosts.
Exactly what do I need to do to set up Smart Hosts for my account?
- Configure your Smart Host. Modify your email server's settings to allow SMTP relays from the three above-mentioned IP addresses.
- Add the Smart Hosts into your JangoSMTP account. Go to Settings -> Advanced --> Smart Hosts, and add the Smart Host. Then Test it to ensure that your email server is setup correctly.
- Set up SPF/SenderID. Go to Settings --> Tracking --> General and uncheck the Use system Mail-FROM address checkbox. Additionally, ensure that the IP address of your Smart Host is listed in the SPF record of your organization's domain.
- Set up Feedback Loops, so that complaint reporting is reflected in your account. Set up feedback loops with AOL, Comcast, Juno/NetZero, Yahoo! and anyone else that allows them, and have the Abuse Reports sent to fbl_sh@us.jangomail.com so that our system can process them.
Monday, September 27, 2010
New SMTP relay service feature: Authenticate a Class C IP block
Our customers using the Jango SMTP relay can now add a full class C IP block to their list of authenticated IP addresses, instead of adding single IPs at a time. To add a class C block of IP addresses (255 IP addresses), contact our support team, and they can do this for you, as the feature is not yet available through our web interface.
Why would I need to allow 255 IP addresses to relay email?
Most customers will not need to do this, but we have some customers that are ISPs, web hosting companies, and cloud computing services. These organizations often need to allow larger blocks of IP addresses in order to serve their own customers.
Thursday, August 19, 2010
New method to specify Transactional Group using the SMTP server
We've introduced a new method to assign a transactional email to a Transactional Group. Along with specifying the Transactional Group in the Subject line, you can now also specify it in a custom X-Header.
If you're using the JangoSMTP server to send transactional email, you're likely familiar with the concept of Transactional Groups -- categories to which you can assign various types of transactional emails. For example you may have the following Transactional Groups set up in your account:
1. Order Confirmations
2. Renewal Reminders
3. Thank Yous
Previously you could assign an email to a particular Transactional Group by specifying the Transactional Group's name in the Subject Line surrounded by curly brackets. For example, if I sent an email with the Subject:
Subject: Thanks for your purchase {Thank Yous}
...then this email would get assigned to the Transactional Group called "Thank Yous", and the email would be sent with the curly brackets and the part in between stripped out.
Now, there's an alternate way to assign an email to a particular Transactional Group...you can specify an X-header with the Transactional Group's ID. If you're sending emails through relay.jangosmtp.net programatically, such as through .Net or PHP code, and if you have the ability to add an X-header to the email message, you can use this method. The format is as follows:
X-TransGroupID: TransactionalGroupID
For example, if the Transactional Group "Thank Yous" had an ID number of 78929, then you would add the header:
X-TransGroupID: 78929
Specifying an X-TransGroupID header overrides any Transactional Group designation in the Subject Line.
You can retrieve the ID number of a Transactional Group by going to the Transactional Reporting section of your account, where the various Transactional Groups are listed, along with their delivery statistics and their ID numbers.
Subscribe to:
Posts (Atom)